Thursday, 29 May 2014

Quilled card

Here’s a card I made quickly for a friend who had never heard of quilling!


And here’s another for someone whose initial is …A J

Another birthday card…all these Geminis keep me busy!


...with a close-up of the orchid in the making…


For more examples of my work please visit my Facebook page here. If you have any questions please feel free to ask. I will be happy to help if I can. If you do use any of my tutorials please do refer to my blog. Thanks.

Tutorial for the orchid can be found here. (This lady is brilliant!) I added the yellow feature just to give it a little colour. 


Wednesday, 28 May 2014

Quilled 3D miniatures - teacup


The smallest tea-cup ever – with a cupcake. This is an ongoing project which I will post upon completion. 

For more examples of my work please visit my Facebook page here . If you have any questions please feel free to ask. I will be happy to help if I can. If you do use any of my tutorials please do refer to my blog. Thanks. 

Saturday, 24 May 2014

Quilled Rose – free tutorial. Two methods.

I use two methods for quilling roses. Each method gives the rose a different look. The first method is one I learnt to make with ribbons as a child. It works beautifully with ribbons of any size and needs no tools. The second method will require a slotted tool.

Method 1: (If using this method with quilling paper be careful not to score or make the folds too sharp – you’ll see why at the end)

1. Hold your strip vertically. Then bring the top part down and to the left at an angle (see pix 1)

Pix 1

   
  2. Take the part facing down (that's the part that is under the fold) and bring it up and over the first fold. It will end up as a right angle (see pix 2)

Pix 2

3.  Now take the strip on the left (again the one underneath) and bring to the right (see pix 3) 
                                               
                                                     Pix 3

4. Bring the strip facing up over and down and continue using the same process (see pix 4 & 5) 
                                              
                                               Pix 4 & 5


5. The end result should look like pix 6 (notice the two ‘tails’ hanging down) when you’re done. 

                                                    Pix 6


  6.   Hold the two ‘tails’ lightly between the thumb and forefinger of one hand. 
  
   7. Lightly take hold of one ‘tail’ and gently pull downward. Yes you are unravelling it from the inside, but in doing so you will see the rose taking shape. (If you have remembered to leave the folds loose this procedure is quite easy) 
  
  8. When you’re satisfied with the size and shape of the rose you can stop pulling and adjust the petals gently.
  
  9.    Cut off the extra ‘tails’ hanging down and glue your rose to seal the ends. There! Your first quilled rose is all done! J
  
  Note: Be careful when working with quilling paper as you don’t want to rip the tail off before the rose is completed. You could practice with a piece of ribbon first if you like. 


Method 2:

You will need a slotted quilling tool for this method.

1. Put the end of the quilling strip into the slot and roll 2-4 times

2. Fold the paper downwards (see pix) and roll again a few times


3. Continue doing this (fold down, roll, fold down, roll) until you’ve achieved the desired size.

4. Glue the end and cut off the extra strip. You now have your second quilled rose. 


You can see the results of both methods in pix below


The pink rose has been done using Method 1 and the white one using Method 2. 

Here are my pink roses done using both methods and my finished project below. (sorry the glue hasn't quite dried on the plant) 


For more examples of my work please visit my Facebook page here. If you have any questions please feel free to ask. I will be happy to help if I can. If you do use any of my tutorials please do refer to my blog. Thanks. 


Wednesday, 21 May 2014

Quilling for beginners – tips etc. Basics


The basics needed to get started are Quilling Paper, a slotted tool/needle, glue and a pair of sharp scissors.

Just for interest I’ve described below some tools that are used in quilling. I’ve also added a few tips on using/making substitutes

Paper: Quilling paper is available pre-cut in various sizes – 2mm, 3mm, 5mm etc. I usually work with 2 and 3mm. You can also cut your own. But from experience I’ve found it’s quite time consuming and I prefer to quill rather than cut J However I have resorted to cutting when I needed an odd size or colour that wasn’t available in my pre-cut lots.

There are several kinds of paper available from double sided bright colours, pastels and pearlised to gold/silver edged ones that are great for those tight coils and also one-sided  strips (coloured on one side and white on the other).
The length of pre-cuts can differ from seller to seller. But you can easily get the length you need  by cutting/tearing a strip or gluing two or three strips together for a longer piece.  (I find when gluing two pieces together that tearing the strip leaves an almost invisible seam whereas cutting it leaves a seam that is quite obvious).


Quilling Tools: Slotted or Needle. The slotted tool is used by placing the end of your paper into the slot and then twirling around. The needle is used similarly, except that the paper is twirled directly on the needle. The finer the needle the smaller the hole in the middle of your coil, which is helpful if you’re making 3D dolls etc. Some quillers also use their fingers. I did try this method and it does work after the initial struggle to get it started. Probably gets better with practice. 


If you don’t have specific tools on hand don’t fret you can substitute with a toothpick. I still use these and keep plenty of toothpicks on hand for just this purpose. I have also used the middle (thicker) part of the toothpick when I needed to make curly hair for my 3D dolls…more on that later.  

Here is a tutorial from Inna for making your own tool http://increations.blogspot.co.uk/2008/04/diy-quilling-tool.html  Inna is a great quiller and I got a lot of my inspiration and tips from her blog. Thank you Inna.

Quilling Mold: 


This is a tool that’s used for creating domes of different sizes especially when making 3D objects. It helps to mold your coil into a nice rounded bowl shape. These can be quite expensive so a lot of quillers use whatever is handy like a marble, ping-pong ball, large beads etc. I have even used the rubber end of a pencil and it works fine. The size just depends on what you’re trying to make. 


Husking Tool: this is used for making various shapes using either a comb or pins stuck on a board. The further away the pins are the bigger/longer your quilled object. I have used glass headed pins stuck on a cork board and also different sizes of combs.

Glue: The best glue to use is a quick drying one that dries transparent like PVA glue. Anything else just makes a mess and might rip your paper. You can use the kind that comes with a tiny nozzle or if you’re on a tight budget you can buy the large one and tip out a little at a time and use with a toothpick (told you those things are useful!). One thing to be aware of if using the toothpick method, the glue does tend to dry out (it is quick drying after all) and thicken. So pour out what you need when you need it and try to do as much gluing in one sitting. If it does dry out  just peel off the dry layer (isn’t it cool how pva glue just peels off like a sheet of plastic?) and start again. Here’s a pix of dried pva glue that’s been peeled off the glue pot. It’s actually dry and hard and you can see the pink quilling paper underneath. 


Quilling Board:


This is handy for keeping your coils at a consistent size, which is important for a neat finish. The coil is placed in the template, allowed to unravel to size and then glued and shaped. For example, the various shapes can be used to tessellate around an object for a 3d project or for creating 2d designs such as cards. Keeping the shape and size consistent is important for a neat finish.

Again, if you don’t have a board, you can substitute with any circular object such as bottle lids of various sizes – anything that will keep the shape consistent.

I’ve added this page just out of interest for anyone that is brand new to quilling. Although most veteran quillers will be familiar with all these tools and more, if you’re a fresher like I was you might find it helpful. If you did please add a comment below. Thank you.


Check my tutorials for ideas, tips and techniques. I have also shared some mistakes I made with my initial ventures in the hope that others can learn. Perhaps if you have similar experiences you can share these so that we can all learn from each other. 

Please visit my Facebook page Quilling Away to see more examples of my work. 

Monday, 19 May 2014

Quilled 3D turtle - free tutorial

I made this little quilled turtle as a fun gift for my son’s 25th birthday lol.  When he was a baby he used to use a little rubber turtle as a pacifier and I thought it might provide a laugh ;)  


How to: 

This was made using 7 tight coils.

Body: 2 large coils – diameter @ 1 inch across. I used two shades of green by gluing them together. The upper part of the body (the shell) is formed into a dome. The lower part is left flat.  

Legs: 4 smaller coils – pinched together at one end to form a tight tear-drop shape (see pix)

Head: 1 coil – pinched to form tear-drop and then curved.


Brush glue lightly on the inside of the dome (shell) and then attach to the flat coil (belly).

Glue the legs and head in place. 

I used my little 1 mm punch on black paper for the eyes.

I put the little guy into a tiny jar and decorated it with a few tufts of grass and some flowers. Oh...I brushed the bottom of the jar with glue first to keep them secure. 


Feel free to use this tutorial to make a quilled turtle of your own. Please do refer to my blog if you do. Thanks.  

Visit my facebook page here for more examples of my work. 


Quilled Teaset tutorial

Still learning…I decided to try this quilled tea-set after I saw some examples on the internet. 

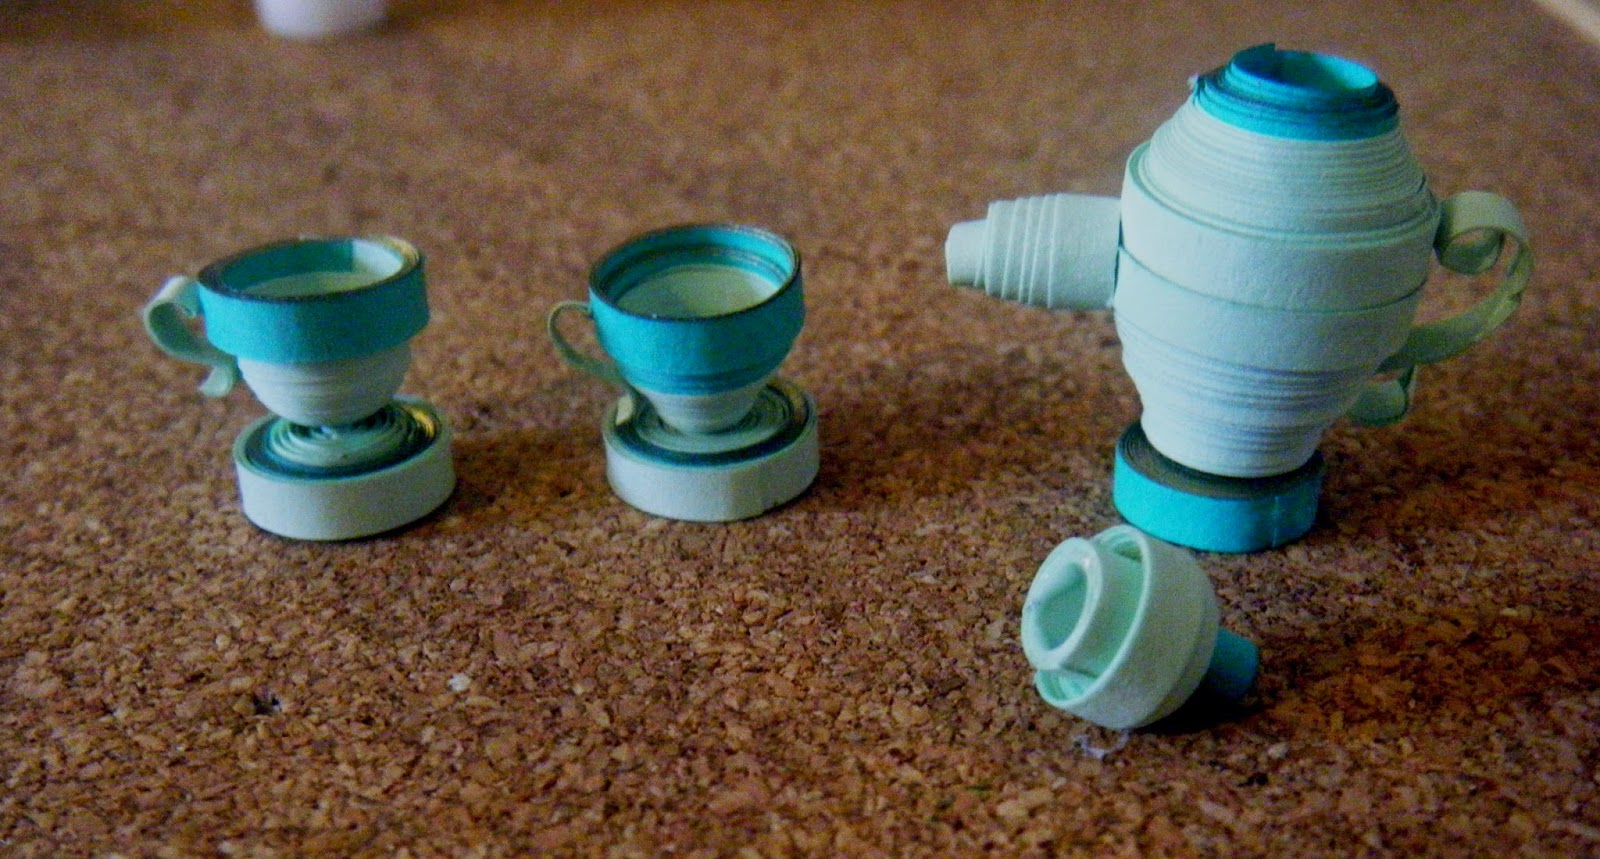
I used two shades of green. The darker shade has a gold edge which stands out nicely when tightly coiled. As you can see, the lid comes off!  The teapot on its own stands at 1 inch. The cups are 1 cm tall. 


I also made some quilled cupcakes to have with my tea :) 

How to make your own quilled tea-set with some yummy cupcakes: 

Tea-set Tutorial:  The saucers and the tray under the tea-pot were all made from tight coils, with an extra attachment of dark green with gold edge. I glued the tray under the teapot to get it to stand as mine kept falling over. However if you gently tap the inside of the dome with some tool (like the flat bottom of a pen or pencil) then you can get it to stand on its own with no need for the tray (which was, obviously, something I forgot to do lol).

The cups also have a dark green strip attached for the rim with a gold edge. Same with the top half of the teapot and the knob on the lid (see pix)

The teapot was made with two domes attached .
As you can see each rounded part started as a tight coil and was then given its individual shape. I brushed the inside of each dome with glue to secure them and keep the shape intact.

Cupcakes: The yellow and cream ones in the picture above are made from grape rolls. The decoration was made by just randomly rolling little bits of quilling paper and gluing on. The brown (chocolate) ones were left flat with a white strip glued in the middle to look like cream filling. 

Cupcakes can be any shape from round, to square to triangular and dome-shaped or flat. Make tight coils, shape accordingly and decorate.  Look at pictures of various cupcakes or even in the supermarket for ideas. 


Check my page Quilling Away on Facebook for the smallest ever tea-cup...it's part of a project I am working on which I will share once it's finished. 

Added on 15/06/2014: Check here for my finished project :) 


Quilled bride free tutorial


Here comes the bride…my first 3D figure! 


Here’s how it's done – sorry as this was one of my first attempts I did not take pictures in progress, but will try to do that for my other posts.

I made 7 tight coils in total: 

For the dress: 3 coils in 3mm strips, white.
Sleeves/arms : 2 coils in 2mm, white (Slightly smaller than the coils for the dress)
Face/head: 2 coils 2mm, skin coloured.
6 Roses: 3 pink, one cream and 2 purple pearlised, 2mm.

The dress: Make cones out of the larger coils. One cone is slightly bigger/longer. The other two need to be more dome-like. Try to keep them the same size. Brush the inside of the cones with glue to keep them from uncoiling.

Glue the open ends of the smaller domes together. Leave to dry. Then attach the two joined ones to the cone. Here is a pix of how it's attached...with one arm. You can see the two domes attached on top and the cone at the bottom. 


Make the arms from the smaller coils. Attach arms to the sides.

The head is made from two domes using skin coloured strips.  
Hair was made with loosely coiled strips. 

Glue one end of hair (loosely coiled strips) to the inside of one dome for the back. Do the same thing with the other dome using shorter strips for the fringe. 

When it’s dry attach both parts of the head on the open sides. 

The  ends that are glued to the inside of the dome will now be hidden with just the 'hair' hanging down. 

Make the flowers and attach 3 to head (try and do this so that the attached part of the two domes is hidden).

Arrange the other 3 flowers and attach to one hand. I cheated and glued them to the front of the dress as well.

I also wrapped a little belt with a bow around the dress to hide the attached bit in the middle. 

There we are. All done! Your quilled bride is ready to walk down the aisle :)

If you try this method I would love to hear your feedback and comments. Thanks. 

Check out my Facebook page Quilling Away to see more of my work. 


To Quill or not to Quill…

…that’s not really the question is it? Not if you’ve acquired a passion for quilling. I’ve been hooked ever since I discovered this amazing method of manipulating paper to create anything from cards to 3D miniature figures. I had entered a card making contest early this year and was researching ideas for making cards – and yes Mr. G. (Google) is good for that J and in my search for pop up cards I came across the term ‘quilling’. Being naturally curious about all things crafty I checked up Mr. G. again and voila – thus began my journey into quilling!

I am by no means an expert. I have had to learn as I went along. I picked up lots of tips from people’s blogs and YouTube videos – sorry I didn’t keep track of the links at the time, but thank you all for your help and inspiration. When I started I didn’t want to invest too much into it as I already had a huge box full of craft materials. One blogger  had a tutorial on home-made quilling paper so I tried my hand at cutting up printing paper from hubby’s stash…shhh. I used these to practice the various twirls and coils. After struggling a little I got the hang of it and liked the results so much that I decided it was time to invest. My first lot of quilling paper was called ‘summer shades’ and consisted of a number of bright colours – I bought those off ebay btw. Since then I’ve been buying them from shops online – they’re cheaper and have a better variety.

Here is a pix of my very first quilled card. It’s simple and not very neat but I was pleased that I’d understood the concept.

As you can see it looks a bit plain, so I added a border and a little petal type thingy (not sure what it was supposed to be!) in the corner and this is my finished project:


It’s not as tidy as I would have liked, but hey! It was my first attempt!
I will be posting some of the tips and techniques that I've learnt and used and, more importantly, my mistakes. Yes, looking back now I can see that I started my projects with more inspiration than knowledge and there are so many areas that I could have done better in – but I’m still learning and I hope that you too can learn from my mistakes. I would love to hear about how you too learned from mistakes/experiences and perhaps, together, we can laugh and learn at the same time.
Oh I did win the card-making contest! Yayyyy!